Selection, splitting and staggering.
Step two
Straightening
Step threeBasic Beveling

m
 m fly rods
Heat treating
Step five Hand planing 1
Hand planing 2
Step sixHand planing 2
Gluing
Step sevenFinal dimensions
Step eightAttaching hardware
Step nineWrapping
Step tenFinish
Rod sock and tube
Step 12 Shipping and
Customer care.
home
Finish is very important on a bamboo rod.
It not only gives the rod a "look" but also protects it from
moisture. Once again there are a host of finishes and was to
apply them. In his book A Masters Guide To Building A Bamboo Fly Rod,
Garrison tells of watching Pinky Gillum use a brush to varnish a
rod. It was a slow and painful process. Garrison came away
from that session determined to come up with a better way to varnish a
rod. His answer was to "dip" the rod in a tube filled with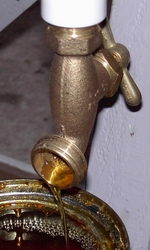 varnish, then slowly pull it out allowing the excess to run
off. The problem with the dip tube is it takes a lot of
vertical space. A section 42 inches long requires 84 inches for
the tube and another several inches for the machinery that draws the
section from the tube. That's over 7 feet. Unless
you're only making short 3 piece rods, it's hard to find a space that
will work, in a normal workshop. Some rod builders got
together and came up with another idea. If you can't pull the rod
out of the varnish, drain the varnish out of the tube. Thus
was born the "drip" tube. The tube has a valve on the
bottom that allows adjustment of the speed of the varnish being drained
from the tube. The picture at right is the valve on a drip
tube allowing varnish to drain back into the can. The strange
thing about dipping or dripping is that the faster the process the
thicker the application, leading to runs in the finish. A slower
application of the varnish allows it to drain from the section.
varnish, then slowly pull it out allowing the excess to run
off. The problem with the dip tube is it takes a lot of
vertical space. A section 42 inches long requires 84 inches for
the tube and another several inches for the machinery that draws the
section from the tube. That's over 7 feet. Unless
you're only making short 3 piece rods, it's hard to find a space that
will work, in a normal workshop. Some rod builders got
together and came up with another idea. If you can't pull the rod
out of the varnish, drain the varnish out of the tube. Thus
was born the "drip" tube. The tube has a valve on the
bottom that allows adjustment of the speed of the varnish being drained
from the tube. The picture at right is the valve on a drip
tube allowing varnish to drain back into the can. The strange
thing about dipping or dripping is that the faster the process the
thicker the application, leading to runs in the finish. A slower
application of the varnish allows it to drain from the section.
I'd be remiss if I didn't mention drying time. Depending on the humidity and heat, varnish takes over 72 hours dry sufficiently to buff out any problems. In some cases it can take over a week! A drying cabinet is a must for almost any rod work. Dust will sneak in and in my situation I'm always fighting it.
When I started making rods, I used tung oil, Then progressed to a wipe on finish. The results were pleasing, but the moisture protection wasn't there. I eventually went to a drip tube and still use it from time to time. But it can be time consuming, messy and doesn't always give good results. Someone suggested Tru Oil, a gun stock finish. I now use it for most of my finishes. I apply between 8 and 10 very thin coats. Drying time is around 3 hours which means the outside gets dry and won't pick up dust a lot quicker than varnish. I can finish a rod in about two days. But the final finish is an acrylic wax, followed by a hand rubbed, hard past wax. I let the acrylic wax dry, buff out any problems, then apply the past wax. I've been convinced that wax is the best moisture repellent on the market, so until I find a reason to go else where that's what I'll use.
varnish, then slowly pull it out allowing the excess to run
off. The problem with the dip tube is it takes a lot of
vertical space. A section 42 inches long requires 84 inches for
the tube and another several inches for the machinery that draws the
section from the tube. That's over 7 feet. Unless
you're only making short 3 piece rods, it's hard to find a space that
will work, in a normal workshop. Some rod builders got
together and came up with another idea. If you can't pull the rod
out of the varnish, drain the varnish out of the tube. Thus
was born the "drip" tube. The tube has a valve on the
bottom that allows adjustment of the speed of the varnish being drained
from the tube. The picture at right is the valve on a drip
tube allowing varnish to drain back into the can. The strange
thing about dipping or dripping is that the faster the process the
thicker the application, leading to runs in the finish. A slower
application of the varnish allows it to drain from the section. I'd be remiss if I didn't mention drying time. Depending on the humidity and heat, varnish takes over 72 hours dry sufficiently to buff out any problems. In some cases it can take over a week! A drying cabinet is a must for almost any rod work. Dust will sneak in and in my situation I'm always fighting it.
When I started making rods, I used tung oil, Then progressed to a wipe on finish. The results were pleasing, but the moisture protection wasn't there. I eventually went to a drip tube and still use it from time to time. But it can be time consuming, messy and doesn't always give good results. Someone suggested Tru Oil, a gun stock finish. I now use it for most of my finishes. I apply between 8 and 10 very thin coats. Drying time is around 3 hours which means the outside gets dry and won't pick up dust a lot quicker than varnish. I can finish a rod in about two days. But the final finish is an acrylic wax, followed by a hand rubbed, hard past wax. I let the acrylic wax dry, buff out any problems, then apply the past wax. I've been convinced that wax is the best moisture repellent on the market, so until I find a reason to go else where that's what I'll use.