Selection, splitting and staggering.
Step two
Straightening
Step threeBasic Beveling

m
 m fly rods
Heat treating
Step five Hand planing 1
Hand planing 2
Step sixHand planing 2
Gluing
Step sevenFinal dimensions
Step eightAttaching hardware
Step nineWrapping
Step tenFinish
Rod sock and tube
Step 12 Shipping and
Customer care.
home
After
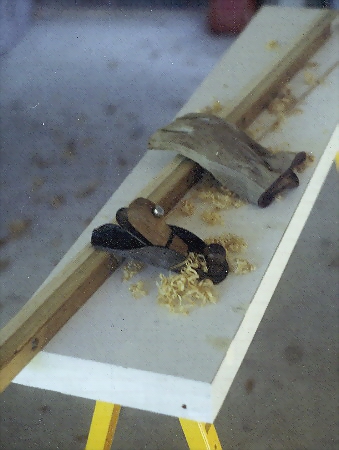
the strips are straightened
and the nodes are addressed, I create the basic equilateral triangle. This can be done with a hand plane and a basic
form with no taper in it.. The picture at the right is the original form that I built
when I first started.
It can also be done by used of a Beveler. This is one of the few steps where I use a motorized machine. Since each strip will be hand planed to final dimensions, it speeds up one of the steps that does not require close tolerance.
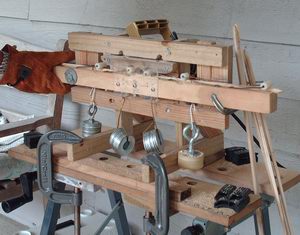 The
Beveler I built is based on designs that have been around for some
time. I adapted it to my "taste" in machinery.
Originally I didn't use the weights to pull the rollers down and keep
the strip from bouncing. Notice the point on the
strip. It allows the strip to go under each roller. When I create
the point on each strip, I also bevel the butt section from the center
to the outside. this makes it easy to spot a strip
that's not right, when I got to bind.
The
Beveler I built is based on designs that have been around for some
time. I adapted it to my "taste" in machinery.
Originally I didn't use the weights to pull the rollers down and keep
the strip from bouncing. Notice the point on the
strip. It allows the strip to go under each roller. When I create
the point on each strip, I also bevel the butt section from the center
to the outside. this makes it easy to spot a strip
that's not right, when I got to bind.
(Part of the "fun" of building bamboo fly rods is the great many challenges we makers get to overcome, in the tool department. For example, slotted planes are not available at your local home improvement store. I had to come up with a way - actually several - to make my own.)
It can also be done by used of a Beveler. This is one of the few steps where I use a motorized machine. Since each strip will be hand planed to final dimensions, it speeds up one of the steps that does not require close tolerance.
The
Beveler I built is based on designs that have been around for some
time. I adapted it to my "taste" in machinery.
Originally I didn't use the weights to pull the rollers down and keep
the strip from bouncing. Notice the point on the
strip. It allows the strip to go under each roller. When I create
the point on each strip, I also bevel the butt section from the center
to the outside. this makes it easy to spot a strip
that's not right, when I got to bind. (Part of the "fun" of building bamboo fly rods is the great many challenges we makers get to overcome, in the tool department. For example, slotted planes are not available at your local home improvement store. I had to come up with a way - actually several - to make my own.)