Home What angle? First angle Sharpening |
And now... the blade
|
Index
Stuff Other Tools Forms Rebuilding Taper info |
|
Home What angle? First angle Sharpening |
And now... the blade
|
Index
Stuff Other Tools Forms Rebuilding Taper info |
 |
If you
have a new plane you'll have a blade (also called an iron) that
looks something like the one on the left whether it's the
original or a replacement Hock blade. (Hock is recommended
by almost everyone.) It'll have a straight edge, and a 30º
angle on the blade.
But if your plane is second hand the chances
are it's blade (iron) will look something like the blade on the
right. Rust and pitting can be a big problem.
If the former owner tried to plane a piece of wood that had a
nail, or even a stubborn knot in, you'll have an even bigger
problem . |
 |
| Even if you've replace the old one you'll have to sharpen
your
iron. You may or may not have to grind the
blade. We'll get to the Scary Sharp system in a bit, but for
now let's look at the steps you go through if you have a used
blade. It'll include all the steps. If you want to get
to the actual sharpening, then jump on down.
First, take the blade out of the plane and examine it. You're really interested in the forward 1 or 2 inches. Look for nicks, rust and pits along both the edge and the back. Both have to be flat and smooth for the plane to work at it's peak. If the blade is generally rusted you can clean it with a steel brush and a lot of light oil. Just get the rust off. If you're using a brush in an electric hand drill or a bench grinder, be careful not to over heat the blade. After you've got it clean, dry it off and put a light coat of candle wax over the area you're not going to sharpen. This will prevent that area from rusting again. (According to several people wax is one of the best moisture blocks. You can use paraffin, sold at many grocery stores. I use the stubs of old candles.) |
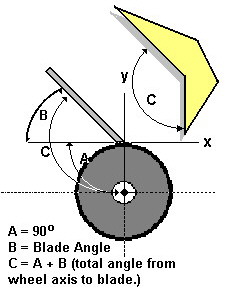
| There's always been a hot debate among rod builders
about the best blade angel for bamboo. Both 9½ and
60½ Stanleys come with the blades ground to 30º.
Most people agree the the angle to bamboo of the 60½ (12º body
angle and 30º blade angle is too shallow and will cause the bamboo
fibers to tear. The answer to this, according to those that
use 60½s, such as Ray Gould, it to grind the edge to a
steeper angle.
Other builders such as Jack Howell recommends grinding a new angle on the 9½. Yet, other builders, such as Wayne Cattanach say no. Australian rod builder, Tony Young says keep the 30º angle on the blade but make the plane angle steeper. In other words, it's up for debate. You can experiment and see what works best for you |
I have no explanation why this change in angle made the blade sharpen better, but there's no doubt in my mine it did. |
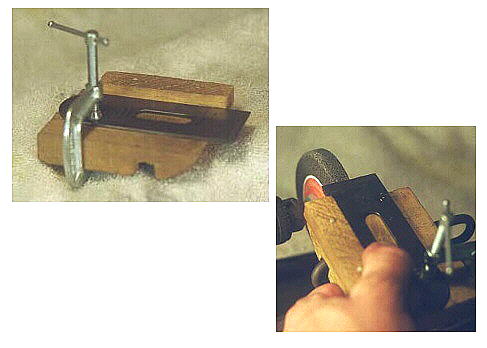
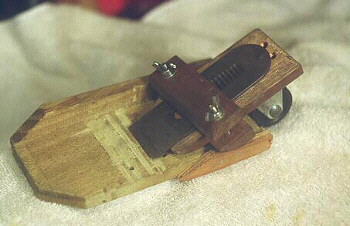
| Now let's turn on the grinder. I want to make sure I'm grinding a straight face that's square side to side. My grinder is a drill held upside down on a base, with a wire guide. To keep everything from moving around I made this grinding jig. It was simple to build. All I had to do was make sure everything was square. I hold the blade in place with a small C clamp. |
 Make light passes over the Wheel. Don't stop until the blade clears the wheel. Don't go to slow. Heat is an enemy. don't let your blade get to hot. If it starts to get hot let it cool off before continuing. Check your progress often. After you've completd grinding take the blade out of the jig and use a square to check the blade is true to the iron. You only have to do this once, so take your time. |
| Your objective is to get the bottom
inch of the back of the blade as flat and smooth as the edge of
the blade on the other side. The flatter they are, the
sharper the blade where they both meet. That's what sharp
is.
There's not a lot to be said about sharpening that hasn't already been said. There are two basic schools of thought on how to get a plane blade really sharp. The first uses Japanese water stones. Both Wyane Cattanach and Jack Howard recommend this form of sharpening in their books. The other school is suggested by the maker of "Hock" blades it's often called the "Scary Sharp" method of sharpening. I use the later for two reasons. First I already had everything I needed and second I wanted to get to work right away, and didn't want to wait for japanese water stones to be shipped. I'd just finished polishing the sole of my first block plane. I started wondering if I could make it flat and smooth, why I couldn't do the same with a plane blade. As it turns out I can. (It was several months later that I learned I wasn't unique. ) |
|
| To do any kind of sharpening, you'll need two tools, a sharpening
jig and a stop block. You can buy several
types of sharpening jigs or you can build your own. I
recommend you use one. So does everyone I know who sharpens
plane blades. I could never come close to being able to
really sharpen a blade without this simple tool. Which ever
one you chose, make sure the back of the blade can be flattened
without remvoing the blade from the jig.
The stop block is easily made with a piece of scrap wood. All it has to do is allow you to set the blade angle in your jig to a predetermined setting. |
My sharpening jig and stop block |
| The rest is simple. Put a fairly course piece
of wet and dry sandpaper on a flat surface. (Make sure
it can't move around) Move your blade backward and forwards
or in a figure 8 pattern over the course material until you get a
uniform surface. Now feel the back of your edge. You
should feel a wire bead has formed along the back. This bead
will have to come off, so turn the blade over and put the first
inch flat on the sandpaper. Move it in a circuler
motion. This should remove the bead.
Once you've done this move to a finer grade of sandpaper and repeat. Once you've gone to the finest you have, you can polish the blade. Place a strip of 2½ in. masking tape on a flat surface, cover it with a light coat of polishing compound and move the blade over the surface the same way you were moving it on the sandpaper. Don't forget to turn it over and polish the back of the blade. You can lightly move you thumb across the edge but if your plane is really sharp you run the risk of cutting yourself. A better way is to lightly press the edge on your thumb nail and see if the blade digs in or skids across the top of the nail. A sharp blade will dig in. You can try to shave your arm, if you're into that. (I've got to admit, I've done that from time to time.) Or you can hold the blade up and look directly at the edge. If you see any light glinting off the edge, the blade isn't as sharp as it should be. If it looks gray, you've done your job. A little paraffin will keep the moisture out while the blade's in storage. Re-sharpening I usually sharpen from about 400 grit on up. It should go fairly quickly. don't forget to polish and don't forget the back. It's just as important as the edge. I try never to put a plane away without sharpening the blade and covering it with rust prevention. |
|

HomeIndex
Stuff you need
Forms
Planes