Home
Fixing problems
                                                    By Terry L. Kirkpatrick
Index
Stuff
Other Tools
Forms
Rebuilding
Taper info
Mechanical Defects
The first problems you'll want to address are any mechanical defects.  There are a few simple ways to "fix" general problems.  Missing parts can be bought or created.  Keep your eye out for a box or can of plane parts.  I've seen them at flea markets and if you plan to end up with more than one or two planes, they may be worth the money.  Lost toe adjustment knobs can be replace by knobs found at hardware stores.   The eccentric lever that moves the toe in and out can be replaced with a washer that's been filed to shape -- something like this.  The lever on the quick release cam, located on the cap is sometimes broken.  You can drill it out and replace the whole thing with a hex screw from the same hardware store.  I put a hex nut behind my cap for additional support.  I filed a "V" in one side of the nut so it would fit flush against the bottom of the cap, then tapped the cap from the bottom side, so the threads would line up.  I don't think it really adds much more than a little piece of mind, but I like it.


The Sole
Fixing the sole can be simple or complex, depending on the problems.  If I only have a few scratches on the bottom of the plane I just level the sole and let it go at that.  Deeper scratches, in critical areas, require removal of more surface and can take a lot more time.  Here are some things that I DON'T recommend.

Using a belt sander.  Unless you can find a belt girt finer than 120 I'd skip the belt sander.  You can end up with scratches as deep as the ones you're trying to remove.   If you do use a belt sander don't keep at it for long periods of time.  The plane can heat up and you run the risk of deforming the sole while it's hot, and having it change shape when it cools.

Files.  If you're going to file the sole down, be very careful.  I've put extra scratches (some of them deep)  in the sole of a plane, being careless with a file.  Once again, you can remove a lot of metal very quickly but you can also remove to much.  If you're determined to use a file, use it across the sole, not along the sole.  That way any scratches will create less problems.

Orbital sanders.  If you have one on which you've replaced the rubber pad with a steel or Plexiglas pad you might be okay.  But the rubber won't flatten the sole.  It will just remove material.  Again, if you do use an orbital sander, don't use grit that's larger than 120.  Go for 220 or finer.  You can end up removing a lot of material and still have to remove as much by hand!

Ask me how I know all this.

I finally ended up using a sanding disk that fits in my 1/4 in electric drill.  It'll remove material quickly and I have a lot more control over it than the file.  There are some rules I've learned to follow.

-Only tighten the plane in the vice enough to hold it there.  Excess pressure on the sides will push the center up and I'll end up with a concave sole when I take it out of the vice.

-Keep the sander moving at the same speed.  Don't slow down, don't speed up.  If I do I'll introduce low spots or leave streaks in the sole. 

-Make a number of passes.  Only work on a strip about 1/4 to 1/2 wide at a time.  Don't use a lot of pressure or I'll be creating work for myself later on. 

-By this time it should come as no surprise that I recommend using medium grit sanding disks.  (120 or finer.) 

-I work both from the front and from the back of the plane.  This will keep me from creating a set of ridges.  Most planes have a convex sole. 

-After I think I'm through with the grinding, I take the plane out of the vice and  make a few swipes over my flat surface and look at the sole.  If there are places that are higher than other places, they'll have telltale scratches on them.  I go back to the disk sander and remove extra metal in these areas.  I repeat as necessary.  (I don't want to over do it, or I'll end up having to remove metal from places that were originally too low.)

When I get through I should see fine scratches in the sole.  When I remove these by lapping the sole will be flat.
 

You may find that using a file or a stone or a belt (or orbital) sander works for you.  If so, more power to you.  The above is what works for me.


The Mouth.
Chips, scratches or a concave toe at the mouth are some of the hardest problems to fix.  Examine the area.  How deep is the problem?  If it's fairly shallow,  grinding, then lapping the sole may be all that's needed.  If, on the other hand, it's deeper than I want to go with  a grinder, my only answer is to re-create the mouth.  When  I do this, I want to go slow.  I expect to spend a lot of time on this area.  Correcting both problems with the toe and the back of the mouth will result in the mouth being slightly larger then it was when I started.

The red arrow points to a problem you can have if you don't watch what you're doing. 

If you don't hold the file parallel to the work area., you'll round the mouth so that it  won't support the blade.  The only way to cure this is to take off MORE metal, making the mouth longer.  If the toe can't come within a few 1/32 of the blade you've lost a bit of the usefulness of the plane.

If the problem is in the back of the mouth, then I have no choice but to file it down.  I use a small fine cut file.  I can take off a lot of metal in a short amount of time with a basted file.  I start by disassembling the plane.  You can leave the Iron adjustment lever if you like, but everything else has to come off.  (You'll have to punch, or drill  the little axle out of the plane body if you want to remove the lever.  Then you'll have to replace it when you're done.  Be careful when you're doing this, you're working with cast Iron and can damage the frog. I'd follow the Doctor's motto, "first do no harm.")

I put the file in a bench vice, tilted, back end down, at about a 20 to 25 degree angle.   I make sure I've got good light.  I work from side to side keeping everything square.  I take my time.  The blade support at the back of the mouth has to line up with the top of the adjustment lever.   While I'm at it, I watch that I don't remove the little fingers off the top of the adjustment lever.  The end result has to be flat.  If it isn't, then I'll have a blade that isn't supported at the back of the mount.  This lack of support can allow the blade to bend in the mouth, causing it to grab and pull out fibers.

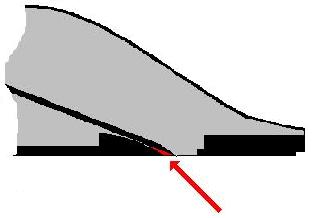
The toe is much easier to work on. If enough material wasn't removed in flattening, then I remove the toe from the body and carefully lap the back side on my flat surface.  I keep the back square.  You can remove about 1/16 of an inch this way.  More than that may result in a mouth that can't be closed as far as you would like.   I use this technique for chips, nicks and a toe that's been worn concave.


The Toe
If the toe doesn't want to move freely, I remove it from the plane.  I examine both the sides of the toe and the slot that the toe rides in.  Look for debris and rust.  I clean this area with a toothbrush and some WD-40.  If this doesn't cure the problem, I use a small flat file to  carefully file along the inside of the plane.  I Pass the toe over my lapping surface a few times on each side.  I  want the toe to slide but not be lose.


The overwhelming theme of this entire process is take your time.  Don't try to hurry the process.  Once you've removed material, you can't put it back. Too much is too much and may make a bad situation worse.  Almost all the cleanup and fix up is done by hand.  Power tools can ruin a project by to quickly removing material.  Before you buy a used plane with the idea of bringing it up to standards, make sure you have the time to spend doing it.

what about the Blade
 

Home
Index
Stuff you need
Forms
Planes